HOW TO PLANT - GENERAL PLANTING TIPS
- Plant trees at existing elevation, except in clay soil where plants should be planted a little higher.
- Sandy soil - plant top of rootball level with ground
- Clay soil - plant top of rootball 2" - 4" above ground level.
- Cover rootball with no more the 1" of soil.
Balled & Bur lapped plants:
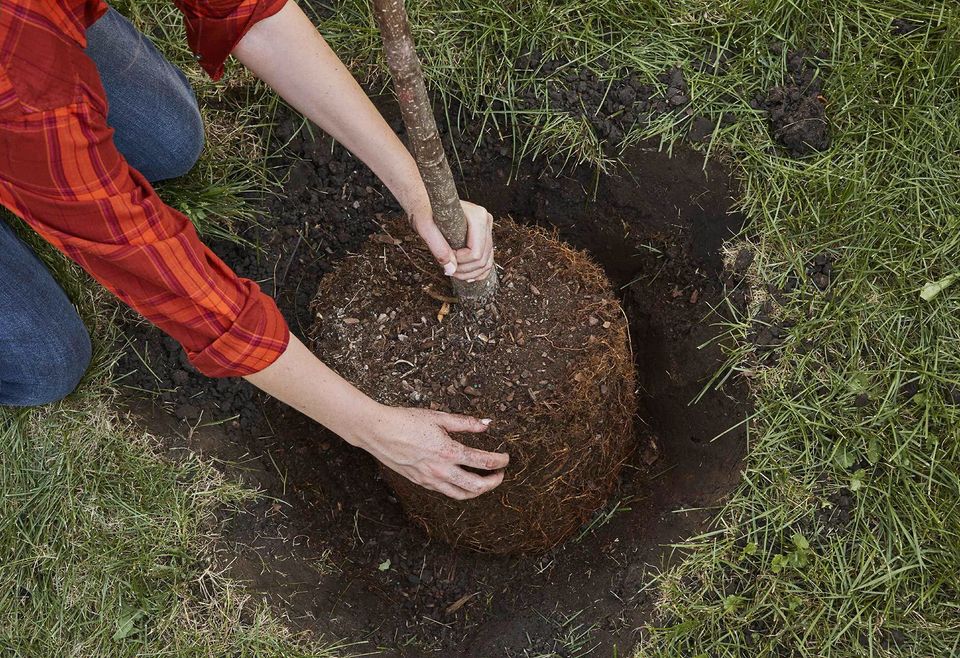
- Dig a large hole, 8" to 12" larger in diameter and as deep as the rootball.
- Gently set tree in the hole.
- Backfill soil into the hole 1/3 of the way up the ball while supporting it.
- After the tree is in position and straight and will not be moved or shift any further cut off the top 1/3 of the wire leaving the bottom 2/3 on the rootball. The integrity of the rootball is the most important thing. If you feel the rootball in not secure enough, leave the entire wire basket on.
- Begin filling the hole, alternating soil and water. Mix soil and water with a shovel to remove any air pockets.
- When the hole is half filled, add the Agriform Planter Tablets, a slow release fertilizer that nourishes your tree for 18 to 24 months.
- Before you fill the hole completely, check for and remove any twine around the trunk.
- Any extra soil should be used to make a well around the rootball to help hold water.
- Fill the well area with 2" of mulch.
- We suggest any trees taller than 6 ft. should be staked and the proper tree straps must be used.
If you have CLAY soil: Dig the hole at least 12" wider than the rootball and 2" to 4" shallower then the rootball. This practice of planting the rootball a little higher than the existing grade does not allow puddling of water, which can cause a tree to drown due to slow drainage of water in heavy clay soil. Backfill with very little, no more then 1/3 organic matter such as pine bark soil conditioner or 1/3 Clay Buster. Native peat is not recommended for use with heavy clay soil nor is amending the backfill too much. Doing so may cause the soil ball to become too wet and the backfill too dry. Possible use of a French drain could be needed.
If you have SANDY, WELL DRAINED soil: Dig a hole 8 to 12" wider than the rootball and depth the same as the rootball. Mix 1/3 to 2/3 Canadian Peat Moss and existing soil. If you have very sandy soil, amend your soil to 1/3 organic material (i.e.: organic humus, comp. manure aged), + 1/3 peat moss and 1/3 existing soil.
PAPER POTS: In Spring or on newly potted plants, cut the rim off the container, then cut 1/6 holes in the side of the container. In late summer and fall or pot established plants, slit the paper container, set the plant in the hole and peel off sides of the container, leaving the bottom on. Plant the same as balled & bur lapped trees. Small #5 containers of plant material requires a hole 6-8" wider that the rootball.
PLASTIC CONTAINERS: Slip plants out of container and follow the above instructions.
CARE OF PLANTS
The success of your landscape depends on the care your plants receive. The main elements for your plants success are:
WATER
FERTILIZER
INSECT AND FUNGUS CONTROL
MAINTENANCE
AND WINTER PROTECTION AND CARE
WATERING is the most important element for a plant after it is planted. There are really no plants that do not need additional water other than what they receive from nature. 90% of most the problems with plants are water related. Either not enough or too much can cause undue stress on a plant. Sandy soil requires more water then clay soil. When watering, saturate the rootball by giving your plant a thorough watering. What is critical is that you saturate the rootball each watering but vary how often you saturate the rootball. Every plant and soil have different requirements, which is why you cannot say water once a week or twice a week and be assured your plant will receive the correct amount of water. What your plant needs is enough water to grow on without standing in water. In sandy soil you are unlikely to over water your plants. However, with clay soil you can get a water and oxygen imbalance, where a plant can drown and suffocate. The only way to know if you are adequately watering your plants is to actually make a soil test by digging down in the soil 6-8" and taking a handful of soil and making a fist. Release your hand; the soil should hold together and feel very moist. If your soil falls apart it is too dry. If it is sour smelling or soggy it is too wet. Adjusting your water will be the answer. When you make this soil sample, try to get some soil off the rootball without disturbing it, which could cause further problems. You can also use a moisture meter. With interface problems you can have a situation where the rootball is of a very light mix that dries out quickly, but the backfill is a heavy soil that holds water and could be wet while the rootball is bone dry. The interface problems can also be reversed: you plant a heavy soil rootball in a very sandy soil-the backfill seems dry, but your plant can actually be drowning because it is not drying out enough between watering.
It is very important to pay attention to what your plants are doing. For example, if your plant is wilting, check moisture in the soil; most likely not enough water. If the leaves are yellowing check the moisture in the rootball; could be your plant is standing in water and suffocating.
Initially after planting a plant, you will want to thoroughly soak your plant more often than you will later on. For example, give those heavy soakings daily for a few days to saturate the rootball and surrounding soil. Then after your plant has been in a couple of weeks, water one to two times a week, depending on the type of soil you have and whether your plants are in the lawn or in a bare area. After your plants have been in several weeks take a soil test to make sure you are watering correctly or to make any needed changes. Increase your watering for the spring in February. Increase to 1-2 times a week through the summer then decrease towards fall. Start slowing down on watering in August and September. Give all of your plants a thorough watering at the end of September and October. After that at least once a month through the winter, increasing watering in February.
FERTILIZATION is also a very important element in the success of your landscape. Initially when you plant, we recommend using the Agriform Planter Tablets. They release fertilizer over a period of 18-24 months. This way the plants receive the nutrients they need at a consistent rate. After your plants have been in the ground for one growing season, we recommend using a fertilizer called Harding's Nursery Special. This is a quick release fertilizer, it releases over a 30-45 day period. This should be first applied in the Spring about the first of May. Then every 30-45 days ending with your last fertilization at the end of August.
INSECT AND FUNGUS CONTROL is an important aspect of maintaining your landscape. We recommend using a broad spectrum insecticide starting the middle of May and every 6-8 weeks after that for insect control. Do your last spraying for the season in mid-October. Fungus is most commonly called black spot fungus. This can be somewhat prevented and treated with a fungicide called Halt. Fireblight is a disease that can hit flowering crabs, mountain ash and other plants in the Rosacea family. To prevent fire- blight, spray your flowering crabs, mountain ash, and other plants in the Rosacea family with a fireblight spray which is Streptomycin in the spring when they are in bloom.
GENERAL MAINTENANCE of your landscape plants is important: pruning and winter wrapping on deciduous trees for instance. Pruning helps the vigor of your plants by removing any dead, damaged or diseased parts. Pruning can help on the appearance of the entire landscape as well. One more item that is very important in maintaining the health of your deciduous trees is the use of a tree wrap. This should be wrapped around the trunks of your deciduous trees that are young enough not to have their mature corky bark yet. This should be applied the end of September and removed in the spring, sometime in May.
PROBLEMS TO LOOK FOR IN YOUR PLANTS
WILTING AND DROOPING LEAVES
Usually the plant is dry and lacking moisture.
YELLOW LEAVES
Can be caused from either too much or not enough water. A soil sample or moisture meter is necessary to determine which it might be. This can also be from heavy tight soils such as clay.
EVERGREEN TREES START GETTING YELLOW NEEDLES ON THE INSIDE OF THE TREE AND TOWARDS THE BOTTOM OF THE TREE
This could be either a natural shedding which all evergreen trees under go in late summer. This is called casting. It could be an insect called mites yellowing and browning with a dusty cast on the evergreen foliage. It also could be a chemical damage.
BROWNING AND YELLOWING ON THE OUTER BRANCHES OR TOWARD THE TOP ON EVERGREEN TREES
Usually this is caused from not enough water, either due to lack of moisture in the soil or desiccation through the leaves from excessive wind and sun especially during the winter. The damage shows up in the spring.
WATERING GUIDELINES
Successful watering techniques are accomplished by watering deeply and infrequently, to help promote a healthy root system. Plants need oxygen to the root zone as well as water, especially in heavier soils (1.e.clay). it takes 2 to 3 years to establish most plants.
FIRST WEEK: Once a day
- EVERY OTHER DAY IF PLANTED IN HEAVY CLAY SOIL
SPRING: March 20 thru June 20: 3 times a week
- 2 TIMES A WEEK IF IN HEAVY CLAY SOIL
SUMMER: June 20 thru September 22: 4 times a week
- 3 TIMES A WEEK IF IN HEAVY CLAY SOIL
FALL: This is a very important time of the year to be watering!
- OCTOBER, NOVEMBER AND DECEMBER - WATER ONCE A WEEK WHEN TEMPS ARE ABOVE 40 DEGREES AND NO SNOW ON THE GROUND
WINTER:
- JANUARY THRU FEBRUARY WATER TWICE A MONTH, MORE OFTEN IF IT IS A WARM DRY WINTER. WHEN TEMPERATURE ARE ABOVE 40 DEGREES, AND NO SNOW ON THE GROUND. WATER IN AM ONLY!
GENERAL WATERING RULES
- Deciduous trees: Apply 10 gallons of water for each inch in diameter of the tree's trunk
- Evergreen trees: Apply 5 gallons of water for every 3 feet of tree's height
-
For plants purchased in container; that will be planted in the ground:
- #1 container= 2 gals. of water
- #2 container= 4 gals. of water
- #3 container= 6 gals. of water
- #4 container = 10 gals. of water etc.
- Drip Systems: When using a Drip System, know what the emitter drip rate is per hour and set your emitter clock accordingly. Most emitters come 1 through 5 gallons options; remember to check your specific product's label.
FERTILIZING
New Trees: Use Agriform tablets when planting, can fertilize again the first 12 months.
Established Trees: Can be fertilized during the months of April-August for best results. Follow product levels to avoid chemical burning on plants.
